
Birk's Dackelgarage: Turning a Modern Tent into a Camp Tent
How to build a cotton tent cover: around 100 euros, under 7 kg, one day of sewing — and not a single seam needs to be watertight.
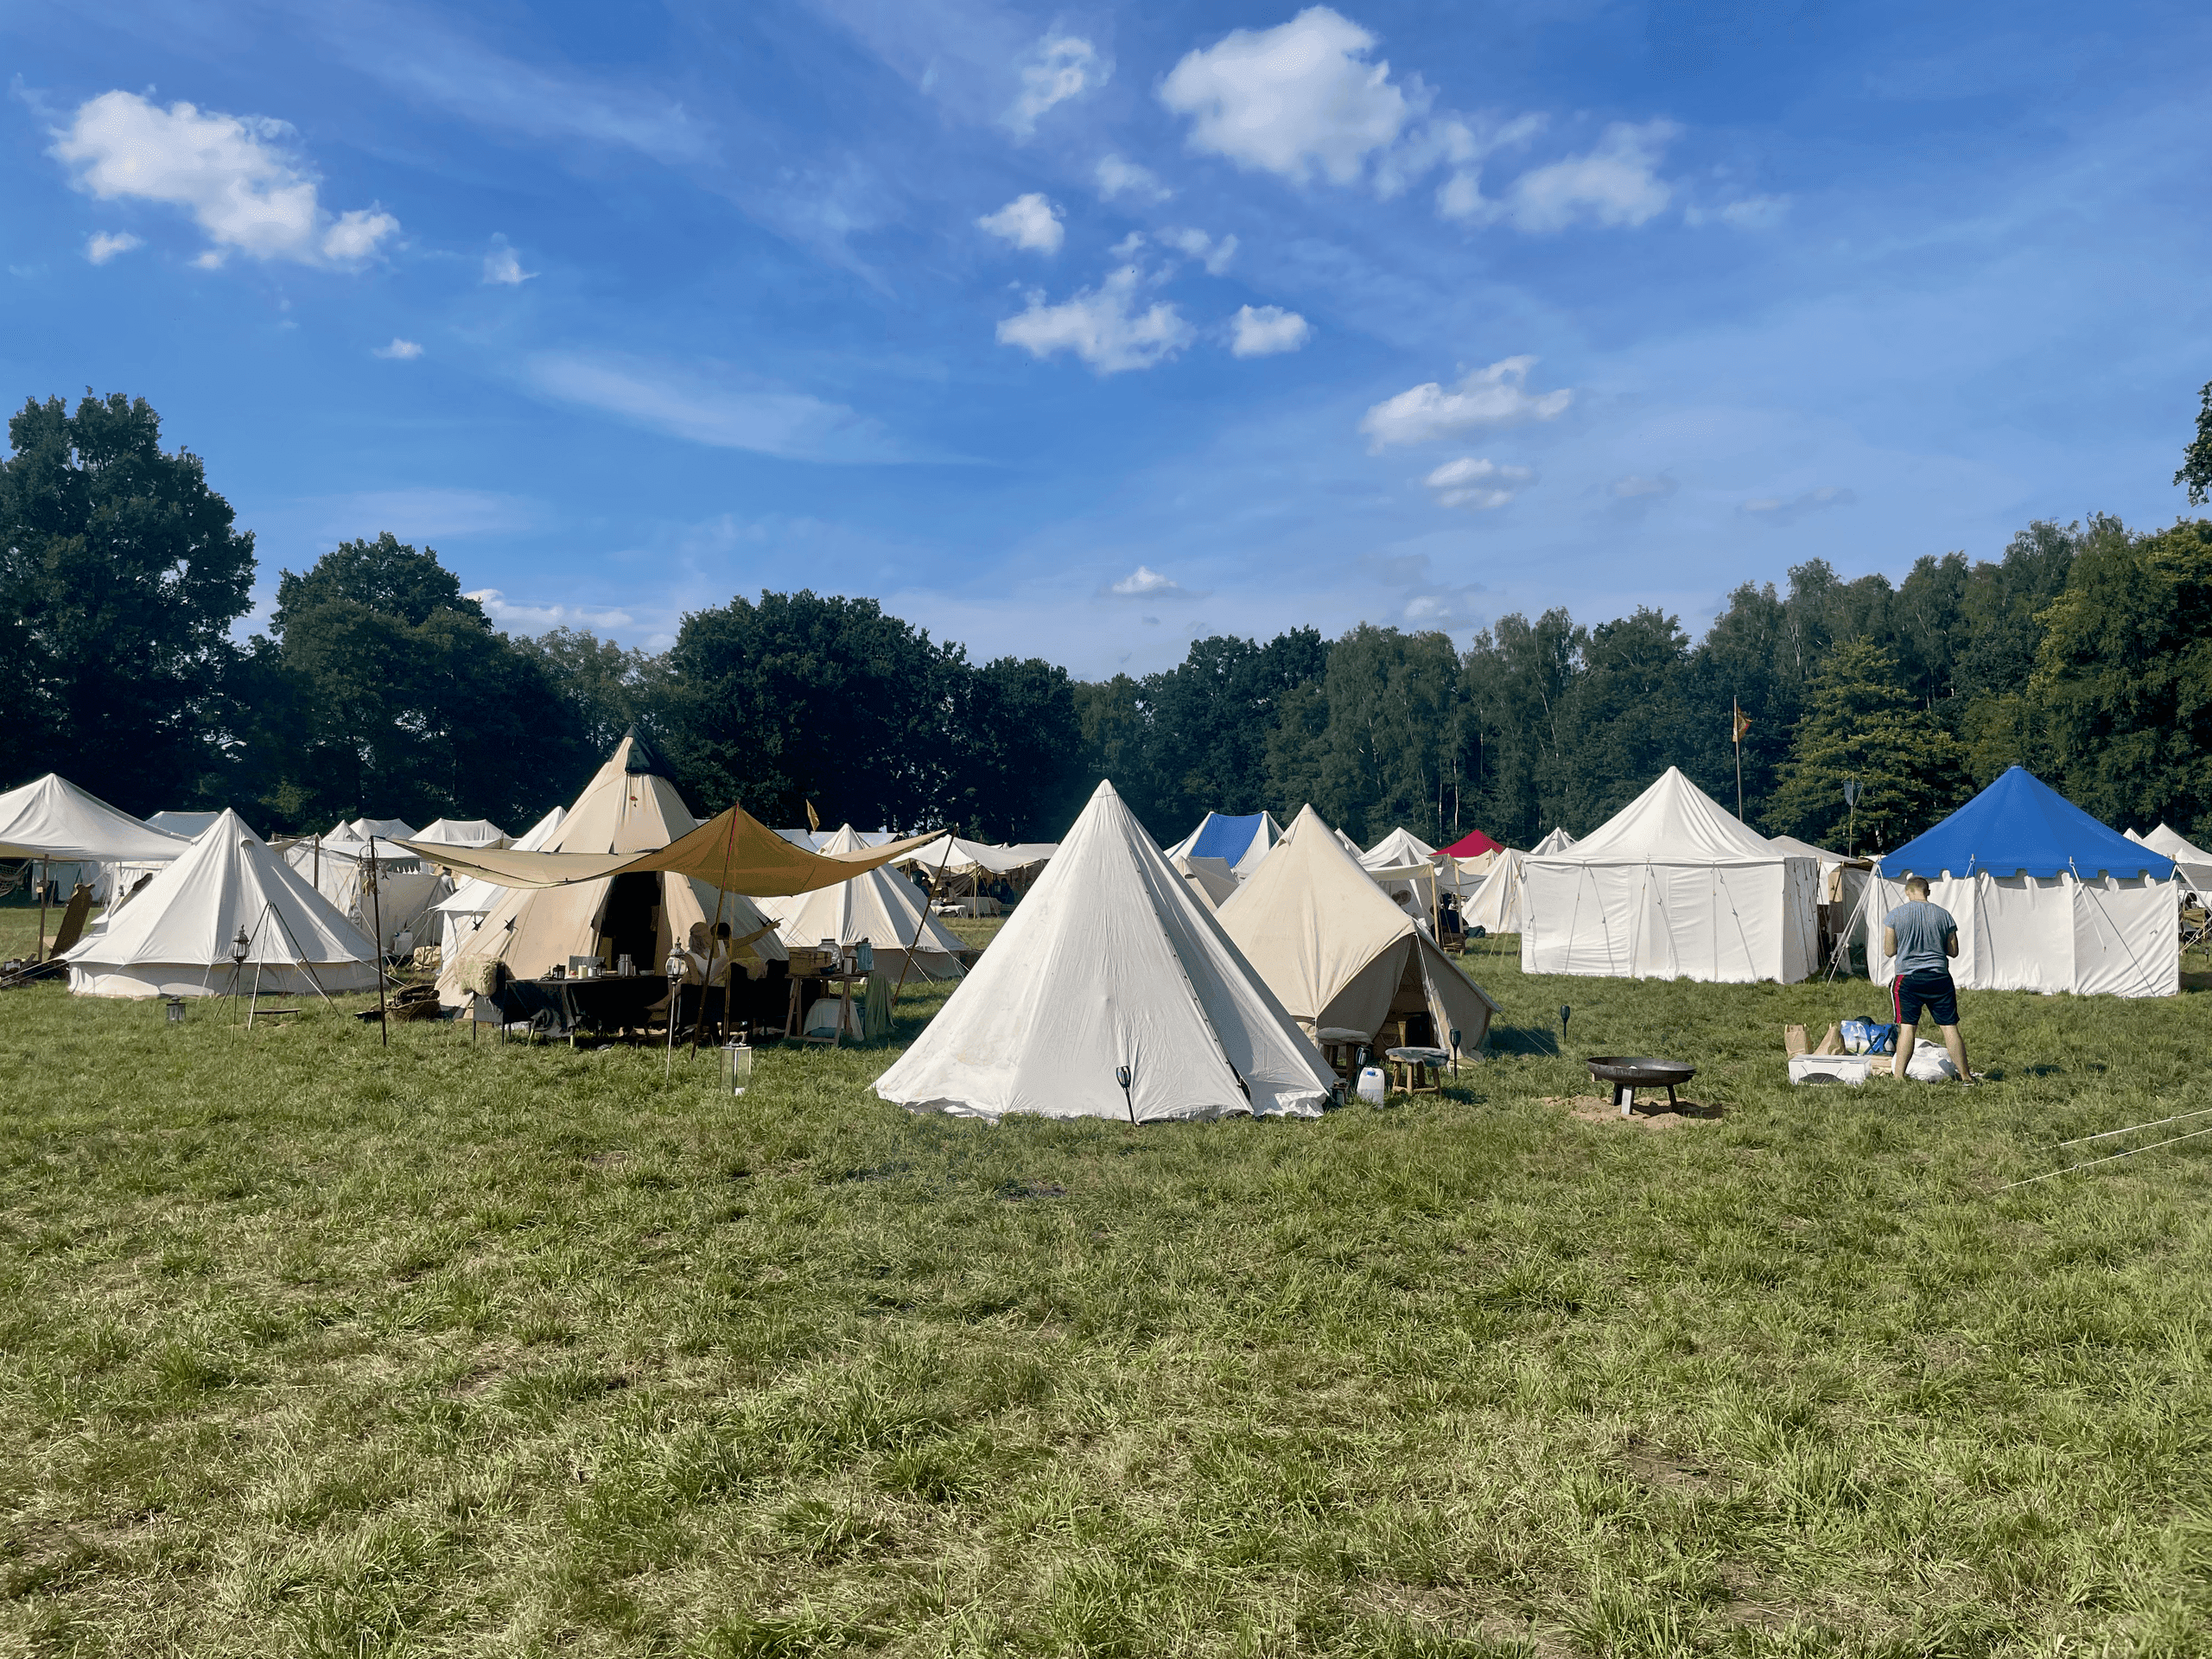
Most newcomers already own a tent. Just the wrong one: a forty-euro dome tent bought for a festival, perfectly functional — and instantly recognisable in camp for exactly what it is.
The answer nearly every guide gives is: buy a cotton tent. In other words, spend several hundred euros so your tent looks right. Which tent makes sense when is something we've written up in our guide to tents and camp life.
But there's a third way, and it costs a Saturday rather than half a month's wages: you build the tent a shell.
Why this works better than it sounds
The real trick is a division of labour: the inner tent handles the weather, the shell handles the look.
The cotton shell doesn't need to be waterproof at all. It can let rain through; it needs no proofing and no sealed seams — there's a waterproof tent underneath. That removes the hardest part of tent-making entirely. You're essentially sewing a very large, very simple sun sail.
And it has a genuine advantage over a real canvas tent: there's air between the shell and the inner tent. That layer shades the inner tent, makes it markedly cooler in midday sun, softens the sound of rain and cuts condensation. Anyone who has woken at ten in the morning inside a baking dome tent knows what that's worth.
Bill of materials
| Material | Quantity | Note |
|---|---|---|
| Cotton fabric, 1.50 m wide | 10 m | The cheapest, lightest cotton you can find is entirely sufficient |
| Grommets, 6–8 mm | 16 | With a setting tool; sold as a kit |
| Guy line | 20 m | |
| Tent pegs | 18 | |
| Poles | 2 | Height per the sizing table below — telescopic or sectional |
| The tent you already own | 1 | e.g. a Quechua MH100 |
On the fabric, explicitly: buy the cheap stuff. This shell isn't an heirloom, it's scenery. Light fabric is also pleasanter to carry and quicker to dry. Undyed, natural-coloured cotton almost always looks better in camp than dyed.
The dimensions
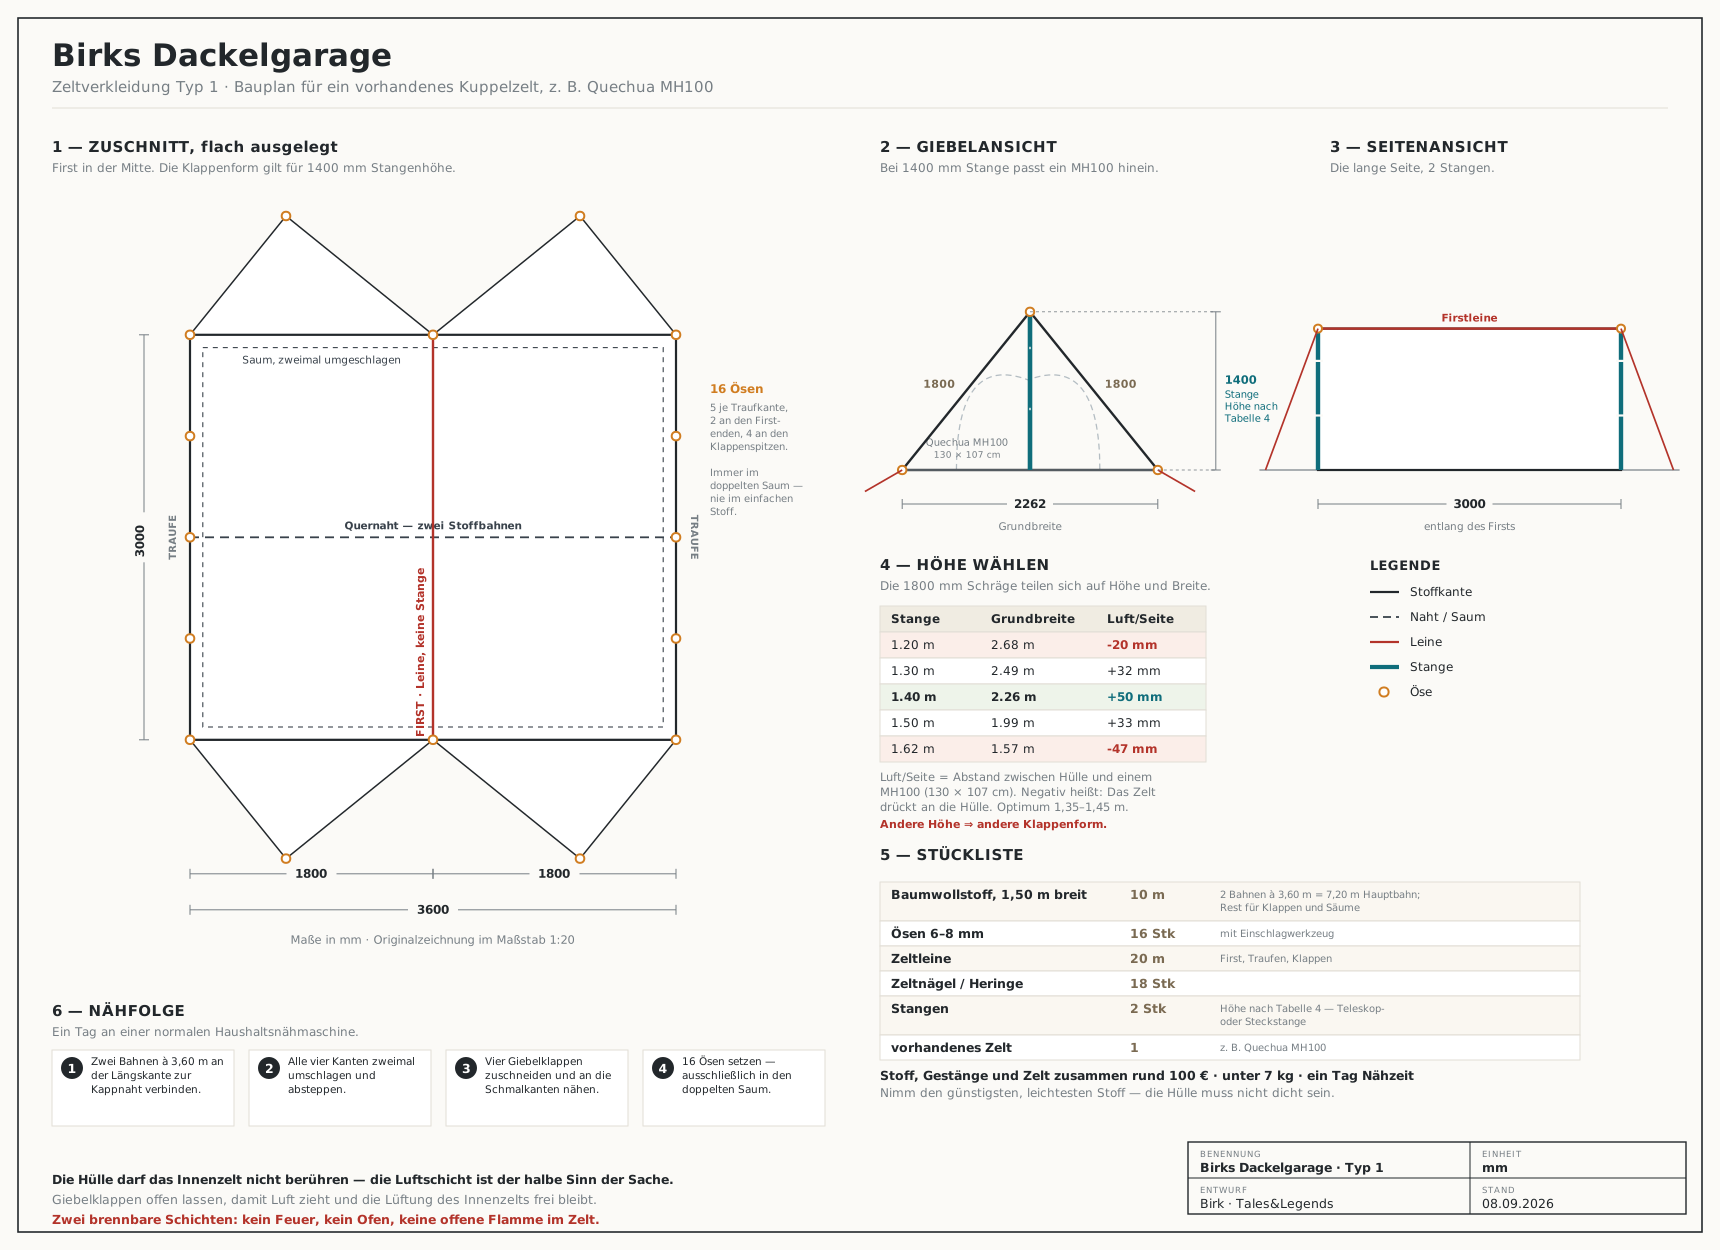
The drawn version has a main panel of 3600 × 3000 mm plus two triangular gable flaps at the short ends. 3600 mm is the width over the ridge: 1800 mm falls to each side. 3000 mm is the length along the ridge.
With 1.50 m wide fabric the cutting plan works out with no waste: two lengths of 3.60 m, joined along the long edge, give you exactly 3.60 × 3.00 m. That's 7.20 m of fabric. The remaining 2.80 m covers both gable flaps and every hem.
How to work out the height for your tent. The 1800 mm of fabric per side is your roof slope — and it divides between height and width. The higher the ridge, the narrower the tent:
| Pole height | Footprint width | Clearance per side |
|---|---|---|
| 1.20 m | 2.68 m | −20 mm — doesn't fit |
| 1.30 m | 2.49 m | +32 mm |
| 1.40 m | 2.26 m | +50 mm — optimum |
| 1.50 m | 1.99 m | +33 mm |
| 1.62 m | 1.57 m | −47 mm — doesn't fit |
"Clearance per side" is the tightest gap between the shell and a Quechua MH100 (inner 130 × 107 cm). Negative means the tent presses against the shell. Only between roughly 1.25 m and 1.55 m is there any room at all — and the most of it at 1.35 to 1.45 m.
Birk's version stands at 1.62 m — three 54 cm segments plugged together. That's where the name comes from: tall, narrow and pointed, like a doghouse (garage) for a dachshund.
And it's also the one point where we disagree with Birk. Run an MH100's cross-section against the shell and, at 1.62 m, the tent presses against the fabric from inside at about 66 cm height — roughly 47 mm too much. In practice that feels like "just about fits": cotton gives, and the tent can be pushed in. But the whole point of the shell is the air gap, and at that spot the air gap is gone. If you're building from scratch, use 1.40 m instead of 1.62 m: same fabric, same sewing time, 5 cm of clearance on each side rather than contact.
Measure your tent first, then pick the height. And not just the width at the ground but the height too: a dome tent is widest at around half its height, and that is exactly where the shell has already narrowed considerably. Which is why the fit never fails at ground level — it fails in the middle.
If you want more headroom and more width, you need wider fabric. Every extra metre of fabric width buys you half a metre more slope per side: with 3.90 m of fabric instead of 3.60 m, a 1.49 m pole gives you a 2.52 m footprint and 14 cm of clearance per side.
Sewing
- Join the two panels. Long edges together, sewn with a double-folded seam (a flat-felled seam). It holds far better than a single seam and won't fray. This seam later runs across the roof.
- Hem all four edges. Fold twice, topstitch. It's the dullest part and the one that decides how long the thing lasts — the grommets sit in these hems, and every load in the shell goes through them.
- Cut and attach the gable flaps. Two triangles at the short ends, folded down front and back. Note: their shape depends on the pole height you chose — at 1.40 m the flap apex sits 711 mm from the eaves and 880 mm outward; at 1.62 m it's 342 and 706 mm. Cut them once the height is settled, or leave them generous and trim them at the first pitch. They close the gables without sealing them — which is the point: the flaps stay openable so air moves and you can reach the entrance.
- Set the grommets. Sixteen: four along each eaves edge, two at each ridge end for the guys, the rest spread across the flaps. Always in the doubled hem, never in single fabric — a grommet in single fabric tears out in the first storm.
A day on an ordinary domestic sewing machine is enough. There are a lot of straight metres, but not one complicated step.
Poles
Birk's poles are three plug-together 54 cm segments, originally from a sun sail found in the cellar — that had four segments per pole, and three of them give the right height. Which is exactly the right approach: look in the cellar first, buy second.
If you have nothing lying around, telescopic tarp poles work very well and let you match the height to your tent steplessly. Sectional poles are sturdier and cheaper. What doesn't work is a single long pole — it won't go in a car and it certainly won't go on a train.
Two poles are enough, one at each gable. The ridge itself is not a pole but a line strung between the two pole tips. That's lighter, cheaper and far more forgiving in wind than a rigid ridge beam.
Pitching it
Inner tent first, as normal. Then stand the two poles at the gable ends, tension the ridge line, throw the shell over and guy the eaves outward — not straight down, but angled away from the tent, so the panels sit taut.
Three things make the difference:
- Let the air gap be an air gap. The shell must not touch the inner tent, or the whole benefit is gone and moisture collects wherever they meet.
- Don't block the inner tent's vents. Set the gable flaps so air moves through.
- Guy it out generously. Nobody sleeping next to a flapping shell stays fond of it for long.
What the shell can't do
It doesn't make your tent fireproof — quite the opposite, you now have two flammable layers. No fire, no stove, no open flame. Still. Everything in the camp safety section of the tent guide — fire, stoves and carbon monoxide — applies here unchanged.
And it's cotton: after a wet weekend it's heavy and soaked, and it needs drying at home like any other canvas. The difference is that it fits on a washing line.
The most honest reason to do it this way: you can be standing in camp next weekend, and it costs you a Saturday at the sewing machine instead of several hundred euros. And if you do buy a real tent in two years' time, you'll have spent those two years playing rather than saving.
What next?
Once the shell is up, all that's left is the rest of the camp: a pitch that won't flood in the rain, a floor build-up that keeps the cold out from below, and a fire that stays outside. All of that is in our guide to tents and camp life.
And when you want to try it out: see when we next take the field together. Bring it along — we'd love to see how yours turned out.
Frequently Asked Questions
Fabric, poles and the inner tent together come to around 100 euros. The largest item is the fabric: 10 metres of cotton at 1.50 m width. Buy the cheapest you can find — the shell is scenery, not an heirloom.
A day on an ordinary domestic sewing machine. There are a lot of straight metres, but not one complicated step.
Very little. If you have ever sewn a hem, you can manage this. The most demanding step is the flat-felled seam joining the two panels — and that is a straight seam.
No, and that is the whole trick. There is a waterproof tent underneath it. The shell needs no proofing and no sealed seams, because the inner tent handles the weather and the shell only handles the look.
Over most small dome and tunnel tents, if you get the height right. The 1800 mm of roof slope per side divides between height and width: a shorter pole gives more footprint, a longer one more headroom. For a Quechua MH100 only the range between roughly 1.25 m and 1.55 m works, and 1.40 m is best. What matters is not the width at ground level but the width at half the tent height — that is where a dome tent is widest and the shell is already narrow.
No. With the shell you now have two flammable layers instead of one. No fire, no stove, no open flame in the tent — the cover changes nothing about that.
Like any cotton tent: spread it out at home and let it dry completely before it goes back in the bag. Cotton packed away damp will grow mould. The advantage over a big canvas tent is that the shell fits on a washing line.
Nils Jäkel has organized summer-theater events for five years and has attended LARP events for the same span; for four years he has also been a camp organizer at one of the largest camps at Conquest of Mythodea, the world's largest LARP event. He spent four years chairing a theater association's board, and for the past two years has served as board chair of the State Association for Amateur Theater Saxony (Landesverband für Amateurtheater Sachsen).
A regular letter from our world: news on events, contributions, and lore — sent straight from Avarra to your inbox.